
Agent Runner Authentication
This page explains the authentication aspect related to Agent Runner during the software development lifecycle, including npm package installations, publishing Docker images, the workload federation with Vertesia Security Token Service (STS), and the implications on your agent.
Overview
Keeping your resources in a secure place is our top priority. That’s why we enforce authentication and authorization in all places in the system. More precisely, when you install dependencies of Agent Runner SDK, the packages are downloaded from our private NPM registry. When you push an image to our Docker registry, authentication is required. The same requirement happens when you trigger a deployment of your agent to our cloud.
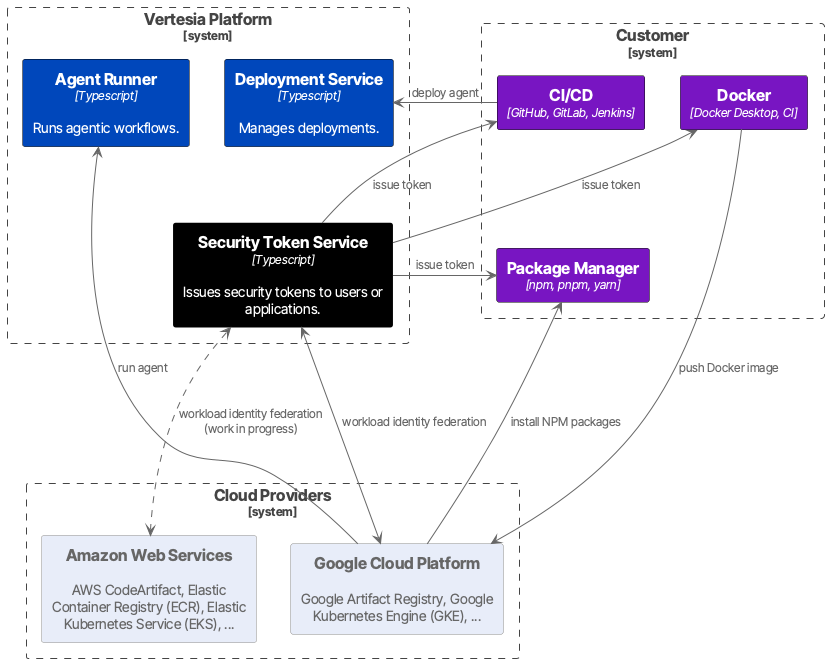
As you can see, this is a complex process. To simplify the approach, we centralize the authentication process into the Vertesia Security Token Service (STS). This improves the user experience by unifying the process in all places during the software development lifecycle, including NPM, Docker, and CI/CD. It also keeps your projects in control, since the tokens are tight to the Access Control Entries (ACEs) defined in Vertesia Studio. It also makes the authentication process agnostic to cloud providers, which facilitates integration with other clouds.
NPM
When you download our private Agent Runner SDK, you cannot download them as public packages. You need to connect to our private registry. This is done by configuring an override registry override in your .npmrc at the NPM project level. Any packages coming from the scope @dglabs/* should be fetched from our private registry. To facilitate your experience, we provide a command in our CLI as vertesia agent connect. This command sets the token into your .npmrc file. Once done, you can fetch and install our SDK into your project.
It is worth noting that we never require access to your NPM registry. You only provide the necessary source code related to a Docker image for the operations. At any time, we do not ask for sensitive information, such as tokens or certificates, to access your source code.
Docker
Your agent will be run as a docker container in our cloud infrastructure. That’s why we need you to package your agent as a Docker image. Once you finish building your Docker image on your local host or in your CI, you need to publish your Docker image to our private Docker registry. By default, our registry does not accept any push requests from external clients. That’s why you need to use a token to connect to our registry. If you have installed vertesia CLI and initialized your agent with our NPM template, you should be able to login to our private registry as follows:
# assume that you are located in the root of the agent project
docker login us-docker.pkg.dev/dengenlabs/us.gcr.io
Under the hook, Docker uses the binary docker-credential-vertesia as a credential helper to login to the registry.
Deployment
The deployment process is handled by the deployment endpoint in Vertesia Cloud. You need to authenticate before sending the HTTP request to trigger the deployment. This is similar to other APIs of the platform. We also implement a sub-command in our CLI vertesia agent deploy so that you can trigger the deployment easily from your desktop or the CI environment.
Cloud Provider
Currently, we store and run your Docker images in Google Cloud. We use Workload Identity Federation to delegate the authentication process to Vertesia Security Token Service (STS). However, it is also part of our roadmap to support AWS and Azure for cloud affinity. It could be useful for compliance, performance, and efficiency reasons. If you are interested in this approach, please contact us.
Troubleshooting
If you need to troubleshoot the authentication process, note that the token used is a JSON Web Token (JWT), which can be found in multiple places: you can find it in the .npmrc file at the root of your NPM project. You can also find it under the configuration directory of the vertesia CLI (~/.vertesia/profiles.json). You can copy the value and paste it to https://jwt.io to inspect the payload and understand the roles and attributes defined in the token. Contact our support if you need any help.